| Here are some of the things I've learned about the Tundra brake system from working on my own truck. Toyota has changed the braking system on Tundras in substantial ways over the years. Some specific information only pertains to the Tundras that have brakes similar in design to the 04 Double Cab. However, some of the generalized information may be applicable to all different Tundra trucks over the years and all hydraulic braking systems.
All information provided here is not intended to encourage anyone to modify his or her braking system. If you don't know what you're doing or aren't comfortable, always have a trained professional work on your vehicle.
My philosophy in providing this information is simple. A truck with an improperly cleaned, maintained or adjusted braking system is already unsafe or not as safe as it could be. So far, I have not found all of this information collected in one place anywhere else. I have also found that most mechanics, even Toyota certified mechanics, will not always take the time to do these things. It is cost prohibitive for them. Therefore, it becomes the concerned owner's responsibility.
Some common complaints about the Tundra brakes are:
- soft pedal
- pedal not "there" at the top or brakes don't grab right away
- pedal "pumps up" or is firmer the second time it is pumped when braking
- rear brakes not adjusted correctly or front brake pads wearing out too quickly or excessive brake dust on front wheels
- poor or inconsistent "panic" braking
- vibration or shudder during stopping (addressed by TSB - Technical Service Bulletin - on older models and required dealer installation of larger calipers and rotors and different pads) If your vehicle does not require TSB brake work (have your local dealer run the VIN to find out) and still vibrates when stopping, read the excellent technical discussion "The "Warped" Brake Disc and Other Myths of the Braking System".
The brakes on a Tundra, like most vehicles, work as a system. This system is designed to pull a 5,020 pound curb weight vehicle plus cargo and trailer (up to a total of 11,800 pound GCVW) from highway speeds down to zero in a safe and controlled manner. When something in the system isn't working correctly or is improperly adjusted, the safety of the vehicle, its occupants and those sharing the road is compromised.
Most if not all of the common complaints about the Tundra braking system can be addressed by proper adjustment of various components and proper maintenance.
A Tundra stock from the factory has several points of adjustment the owner or a qualified service technician can manipulate to effect the system's performance (hopefully to improve the reliability and predictability of the stopping power). By "adjustments" I am not referring to the wide variety of aftermarket pads, rotors, lines, or other "upgrades" that can be added to the OEM system. Nor do I mean to include TSB's that have been issued to address design problems on earlier models. Those are for a different discussion.
Order of Work
For best results, adjustment/maintenance should be performed in a specific order to eliminate unnecessary work. If at some point you feel you have the pedal feel and brake response you want, you don't need to go any further. Similarly, if you KNOW a certain aspect of your system is mechanically sound and working properly, you don't need to waste valuable time cleaning, lubing or adjusting those parts.
- Brake System Inspection
- Clean and Lubricate Brake Components
- Adjust Rear Brake Shoes
- Adjust Parking Brake Cable
- Bleeding Gas from the Hydraulic System
- Adjust LSB & PV
- Keeping Water Out of the Hydraulic System
Each type of work is explained below.
Brake System Inspection
A complete visual inspection of your braking system reveals any physical defects in the system and allows you to replace defective parts prior to making adjustments.
Visually inspect fluid in reservoir for proper level and cleanliness. If fluid is between min and max levels, do nothing. If fluid is milky or any other color except golden clear, flush the system with fresh fluid.
Visually inspect front pads and rear shoes for visible signs of cracking or excessive wear. Replace worn or damaged pads or shoes. Visually inspect front disks for cracking or grooving. Turn or replace as necessary. Visually inspect rear drums for cracking or grooving. Turn or replace as necessary.
Visually inspect brake lines under chassis and where they connect to each wheel. Look for signs of dry rot, kinking, binding or any fluid leakage. Replace any defective connection or line. Visually inspect wheel cylinders for leaking fluid. Rebuild or replace as necessary.
Visually inspect rubber boots on inside of rear brake backing plate for cracks or missing pieces of rubber. Replace to keep inside of rear brake system clean and free from dirt and oil from roadway.
Clean and Lubricate Brake Components
The braking system at each wheel must be kept clean and lubricated so the rear auto adjusters will work properly and the front and rear component parts will work together.
Front calipers should be lubed with caliper grease each time pads are replaced. If one brake pad on a front wheel wears faster than the other, this is a good sign the caliper is not squeezing evenly or not releasing completely. Proper lubing of the caliper will usually fix this. Be careful not to use excessive lube or get any lube on the pad surfaces or rotor surface.
Rear shoe pivot points, and particularly the threaded tensioner adjustment mechanism, must be kept clean and lubed. You should easily be able to turn the tensioner with just your fingers. If not, it should be disassembled, cleaned with brake parts cleaner and lubed with brake lubricant. Any friction point should be lubed lightly. Do not allow lube to get onto the shoe surface or on the drum surface. Do not use excessive lube that can drip onto braking surfaces when components heat up.
Click here for: Exploded view of rear brakes showing lubrication points and recommended lube. (note: image from a 2003 Tundra rear brake assembly)
In the cab under the dash, a small amount of lubricant applied to the brake pedal pivot points will reduce friction and keep the pedal linkage from squeaking.
A properly cleaned and lubed wheel assembly is ready for adjustment. Front calipers cannot be independently adjusted.
Rear Brake Shoe Adjustment
The brake shoes on the rear drum brakes are adjustable using several methods. Perhaps no topic has received more discussion and caused more frustration with the Tundra braking system then the proper and best ways to keep the rear brakes adjusted. Toyota manuals seem to provide contradicting information on this and different year Tundras have different setups back there. For the 04 DC, here are the options:
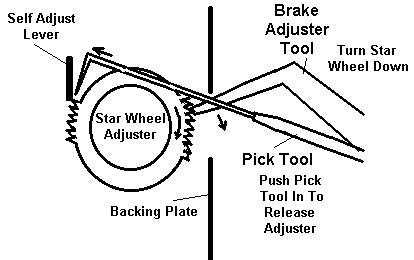
1. Manual adjustment using the access hole in the rear (inside) of the brake backing plate.
First, block the front wheels, jack up the rear of the truck and stabilize with stands. Put truck in neutral with parking brake OFF. Remove the rubber plug from the adjustment hole. Using a brake adjusting tool or suitably sized flat screwdriver, rotate the star adjustment tensioner one click at a time while turning the wheel with your hand. Continue to adjust the star tensioner until you can just feel the drag of the brake shoes on the inside of the drum when the wheel is turned. STOP. Over tightening at this point can cause undue expense and is difficult to reverse because the drum will be stuck on the brake shoes and you cannot get into the star tensioner to release the shoes. You will have to use a technique like the one below to get the tensioner loose again so the wheel will turn without too much drag:
(image courtesy of TundraSolutions.com member)
When adjusting the star tensioner, it will only turn one way and a clicking sound will be heard as the ratcheting lock clicks into place on each star point. If you can turn the tensioner both ways, the ratcheting mechanism is not working and you need to remove the drum and fix it.
2. Manual adjustment removing the drum and turning the tensioner by hand.
This method is a little more labor intensive as it requires removing the wheel and drum, but it does not allow for the possibility of overtightening the tensioner. You also can inspect for worn or damaged parts while you have the drum off. Personally, I prefer this method if I already have the wheel off for other reasons (like cleaning and lubing, swapping winter or summer wheels, etc.).
First, block the front wheels, loosen the lug nuts, jack up the rear of the truck and stabilize with stands. Put truck in neutral with parking brake OFF. Remove the lug nuts and wheel, then remove the brake drum. Use a properly sized bolt in the two threaded holes to push the drum off if necessary. Mine are off and on several times a year and usually slide right off with a light tug. Locate the star tensior and turn several clicks. Try to fit the drum back on. Continue the process until the drum requires slight pressure to slide over the shoes or will not fit back on. Using one finger, push the ratchet mechanism away from the star wheel and back it off one click at a time until the drum just fits over the shoes. Reinstall the wheel and lug nuts. Torque lugs to 84 ft lbs. Rear shoes are adjusted.
3. Automatic adjustment using parking brake driving forward or when parked. Many of the newer style Tundra rear brakes can NOT be adjusted tight enough using only the parking brake while moving FORWARD or STANDING STILL. If the rear pads are extremely loose, exercising the parking brake will cause the shoes to tighten somewhat, however, they will not be tight enough using this method alone. The tensioner assembly relies on rocking action between the two brake shoes for it to tighten itself automatically. I have been unable to get a good result from using only the parking brake to keep the rear shoes adjusted. Previous Tundra designs had a different rear brake setup where the tensioner assembly was actually attached to the parking brake assembly and this type of adjustment could work, but the 04 DC does NOT have the tensioner assembly attached to the parking brake mechanism in any way. This procedure will not keep the shoes tight.
4. Automatic adjustment applying the brakes and parking brake WHILE TRAVELING IN REVERSE.
I have had good luck adjusting the rear shoes while applying the parking brake and regular brakes repeatedly while driving in reverse. This type of braking causes the type of shoe rocking action necessary for the automatic tensioner to move tighter in response to the spring loaded ratchet lock that is supposed to turn it. If your tensioner mechanism is properly lubricated, not corroded or excessively dirty, this will probably work for you.
Drive slowly in reverse and apply the parking brake MILDLY (about halfway or 3-5 clicks) to get the front shoe snug against the drum. Apply the brake PEDAL in pumping fashion to get the rear shoe to periodically grab against the drum resulting in a rocking action between the front and rear shoe. The tensioner assembly cannot be overly tightened in this way due to the light force applied by the ratcheting lever. When you are satisfied, release the parking brake and test the brakes by driving forward normally. Alternatively and a little more tricky to pull off, one can alternatingly apply the parking brake and the regular foot brake in alternating fashion to achieve the type of brake shoe rocking action necessary to tighten the rear. This is tricky with the way the parking brake works, but with a little practice, can be done and works very well.
You should immediately notice firmer pedal if your rear brakes were too loose and your adjustment method was successful. Don't be surprised if you suddenly have very touchy brakes! You may notice a slight burnt smell after driving a few miles. This is just the rear brakes seating in. Most likely, they have never been properly adjusted before and some material is now touching the drum during braking that never touched before. If the smell doesn't go away after a few miles or something doesn't feel right, stop immediately and have the system checked out by a professional or remove the wheel yourself and see if something is wrong. Most likely, your Tundra's brakes will feel better then they ever have and you will have much more confidence when stopping under all conditions including panic stops and when towing.
I find myself using procedure #4 on a regular basis about every three weeks or so. It's easy to do when backing out of the driveway or similar situation and will keep the rear shoes snug and working well.
Once the rear brake shoes are adjusted properly, you may need to adjust the parking brake cable.
Parking Brake Cable Adjustment
Parking brake should be adjusted AFTER rear brake shoes are adjusted.
As you use the parking brake over time, the cable stretches and the different attachment points settle into their places. But, if your rear shoes have never been properly adjusted, once they are snug against the drum, there is a chance the parking brake cable will be too tight causing the brakes to drag even when the parking brake pedal is fully released.
Toyota has provided a turnbuckle connection to keep the cable taught so the parking brake pedal will not bottom out against the floorboard when the parking brake is applied nor be too tight when it is released fully. The turnbuckle is located on the parking brake cable under the truck frame near the driver side door. Just use the appropriate wrenches to tighten the turnbuckle to take the slack out of the cable or loosen it so there is no tension when the parking brake pedal is fully released.
Bleeding Gas from the Hydraulic System
Gas phase substances in a liquid hydraulic braking system result in pockets of compressibility and manifest themselves as a spongy or weak pedal.
Gas in the brake fluid is usually either air or water vapor. Air enters from a leak in the system and water is hygroscopically attracted to the fluid from any air exchange and is subsequently vaporized to steam if the fluid heats up to the boiling point of water. Gas is removed by "bleeding" the hydraulic lines to remove trapped gas bubbles along with old fluid.
There are 6 bleed points on a Tundra: each wheel, the LSP & BV has a bleed point and the master cylinder has a bleed point. Start with the bleed point farthest from the master cylinder using the normal procedure and proceed closer to the master cylinder at each bleed. Pay special attention to the LSB & PV bleed point as stubborn bubbles can become trapped in there. Sometimes tapping on the valve body in between opening the bleed point can help dislodge bubbles.
LSP & BV Adjustment
Tundras come equipped with a front/rear bias adjustment valve designed to balance the braking force between the front and rear brakes based on the weight sensed above the rear axle. This is done by the Load Sensing Proportioning and Bypass Valve. The valve operates by sensing the height of the bed over the axles which changes as the rear springs are compressed as weight is added to the bed. The more weight over the rear wheels, the more traction they have and the more braking force can be applied to them before they start to loose their grip on the road surface.
A variety of things can affect the performance of this valve or the desirable front to rear brake bias. Examples include:
- lifting or lowering your truck in the front or rear which changes the height of the bed over the axle and raises the center of gravity without changing the spring rate (using bushings, shackles extension, etc)
- putting stronger springs in the rear or adding a leaf or bagging in a way that changes the spring rate
- changing the pad or shoe material on either the front or rear brakes
- allowing your rear brake shoes to become out of adjustment (should be corrected before adjusting the valve)
- running different diameter tires front and rear or tires with different widths or different tread patterns or traction characteristics front and rear
- changing the rotor diameter on the front brakes
- changing the caliper size and pad material size on the front brakes
- putting disk brakes on the rear
Of each of these modification, all but number 2 can be compensated for by adjusting the LSB & PV LOCATION relative to either the axle or bed using the procedure below.
If you change the spring rate of the rear suspension as in bullet point 2, the amount of travel between the bed and axle is no longer in the same proportion to the weight. You have changed this value by changing the spring rate. Therefore, the proportioning valve RATE must be adjusted (not the location). The adjustment described below does NOT address compensations for changing the SPRING RATE. All other modifications listed above are simply changes that affect the proportion of braking front to rear, not the proportion of weight above the axle relative to the distance between the bed and axle.
A procedure exists for bringing the LSB & PV valve back to the factory setting. Essentially, it involves placing a pressure gauge in the front and rear lines and adjusting the valve until the proper front to rear ratio is achieved. However, if you have made any of the modifications above, it is questionable if the stock factory settings are the best way to go for your new, "improved" vehicle.
If you choose to adjust the LSB & PV, here is the factory procedure.
Click here for: Proportioning Valve Adjustment to Factory Settings
You can choose to adjust according to your setup by using real world testing rather than pressure gauges as in the factory specification. By increasing the shackle distance "A" on page two of the link above, you will increase the pressure going to the rear wheels and vice versa. I recommend turning only two turns at a time and then driving your truck in an unpopulated safe place to see if the adjustment suits your needs.
Keep in mind that improperly adjusting this valve can lead to dangerous brake behavior in weather or under conditions other than those you tested on the day you made the changes. For example, rainy or snowy weather in a loaded bed condition could cause the rear wheels to lock up resulting in uncontrollable stopping, so BE CAREFUL and make sure you understand what you are doing when you adjust the bias valve.
If you have modified the ride height of your truck (raised or lowered) you will most definitely need to consider adjusting the LSB & PV valve. If you cannot adjust it suitably using the adjustment points in the instructions above, you may need to fabricate a mounting bracket on either end of the mechanism where it connects to the bed frame or the axle housing so you can bring the unit back into adjustable range.
Keeping Water Out of the Hydraulic System
Brake fluid attracts moisture from the air (hygroscopic action). Each time the fluid is exposed to humid air (when the master cylinder cap is opened or old brake fluid is added to top off the level), water enters the system. If the water travels through the brake lines (during bleeding for example) to a point near a wheel where it is exposed to heat from aggressive braking, the temperature may rise to the point the water liquid turns to water vapor thus substantially reducing the hydraulic pressure on the brake pads or shoes and temporarily causing the brakes to fail or reducing the drivers ability to modulate the braking pressure. Water boils at 212 F, whereas normal DOT 3 and 4 brake fluid boils above 400 F. You can easily see that water is not good inside a brake system.
To keep moisture from building up in your system
- Minimize the amount of time the master cylinder reservoir is open. Modern brake systems are designed so you do not have to open the master cylinder reservoir except in certain circumstances. As the pads wear away, more fluid can be held in wheel cylinders, thus causing the master cylinder reservoir level to drop. However, topping it off at this point will result in corresponding overflow when the wheel cylinders are compressed to install new, brake pads/shoes. Usually, the only time it will be necessary to add fluid is if there is a leak or failure in the hydraulic system or if you are bleeding the brakes and need to add more fluid to keep a steady level.
- Never store brake fluid once it's been opened. Buy just enough fluid to do the job each time and dispose of the rest so you wont be tempted to save a few dollars by using it off your workbench a year later. It's sure to have absorbed significant moisture by then and your entire brake system will need to be flushed if you use it.
- Many folks recommend replacing the entire volume of fluid in the braking system every year to two to remove accumulated moisture, frictional debris, or degraded fluid. This is similar to flushing the coolant system or transmission fluid as part of a preventive maintenance program. I suggest you consider changing out the brake fluid in your system at a maintenance interval suited to your driving style and environmental conditions. It is important to realize that brake fluid is not designed to last the life of your vehicle and that your braking system will be better maintained if the fluid is changed periodically.
|


